Git Setup for Absolute Beginners
[Contents]
- 1. The official get-start documentation
- 2. Check your existing keys
- 3. Prepare your
ed25519key pair - 4. Adding your SSH key to the ssh-agent
- 5. Test your SSH connection
- 6. Reference
Nowadays, almost all IDEs come with git out of the box. All you need is to authorise the connection from local to git servers via SSH (Secured Shell).
This simple step by step tutorial is a re-formatting (hopefully more straight forward) of GitHub official documentation and is meant to be used by absolute newbies – no offence we were all there and I am still relatively junior after a few projects. However, from time to time, experienced developers might also need to newly or re-setup on new systems.
1. The official get-start documentation
The official tutorials are well made available as in official GitHub Docs. It is however quite lengthy and can be overwhelming if you simply want to let your favourite IDE be able to pull from and push to GitHub repositories and you cannot wait to get your hands dirty in the coding world.
Like said most of the morden IDEs are built with git features, just name a few,
- macOS Shells: does not really matter if you favour bash or zsh, as the OS has included
gitwhen manufactured as in these days - Microsoft Visual Studio Code: the most fast emerging IDE powered by Microsoft - I know they’ve always been ambitious
- JetBrains (formerly IntelliJ) IDEs, PhpStorm, WebStorm, PyCharm. Most of them are NOT FREE but if you do not want to tune your VSCode to work intelligently in your way, they’ve done this for you.
With such tools ready all you need for git is to set up the communication protocol between these and git, via SSH as you have imagined.
Therefore if you are interested in reading the official tutorial, head directly to the section Connecting to GitHub with SSH. Here I will show you how to do it in one page.
2. Check your existing keys
In your Terminal,
% ls -la ~/.ssh
# Lists the files in your .ssh directory, if they exist
Note:
When copy and paste CL (command lines) make sure you start from AFTER symbol
%. You may also see hash tag#leading a CL. This is the case if you usebash shell. In writing this I am usingzshellthat is defaulted in macOS Big Sur. The leading symbol is%.
You may get a list like,
config
id_ed25519
id_ed25519.pub
id_rsa
id_rsa.pub
known_hosts
id_ed25519 and id_ed25519.pub are what you are looking for if you previously set up with git. However, your new system might end up with nothing or in most cases, just these lines,
id_rsa
id_rsa.pub
These are the system defual private and public keys respectively. It is not recommended to use id_rsa.pub as your public key to present to Git but you insist you can, only with a few hassles, for example in a later step when you add this key to your SSH agent in the Terminal, this happens,
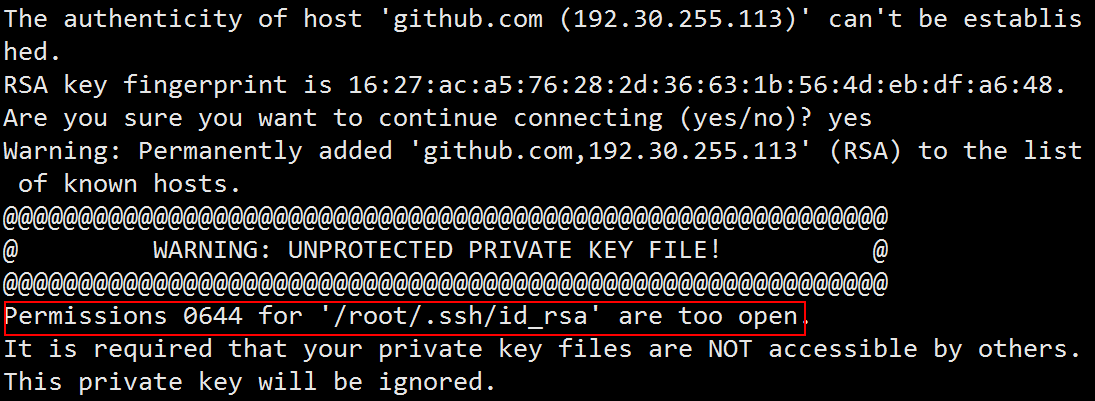
The solution to this is to chmod your public key’s file permission to be 600 or lower. Since this is a system default key pair you’d rather not to mess them up just do it right and go ahead to generate a GitHub specified key (or key pair).
3. Prepare your ed25519 key pair
% $ ssh-keygen -t ed25519 -C "[email protected]"
Note:
If you are using a legacy system that doesn’t support the
Ed25519algorithm, use:% ssh-keygen -t rsa -b 4096 -C "[email protected]"
New SSH key pair are to be generated. When prompted for location of file saving, just hit Enter. It will by default put the new keys together with existed ones under ~/.ssh/ for good.
Generating public/private ed25519 key pair.
Enter a file in which to save the key (/Users/you/.ssh/id_ed25519): [Press enter]
Then it prompts to you for a passphrase (password of the keys in human language),
Enter passphrase (empty for no passphrase): [Type a passphrase]
Enter same passphrase again: [Type passphrase again]
Type and repeat your passphrase followed by Enter - as an newbie to the Linux world you might just realise nothing happens when you type your passphrase. This is meant to be like this so don’t worry. If you are not sure you repeated it correctly the system will let you know and you will be asked to redo it if something goes wrong.
Followed the wizard you should now have a key pair underneath ~/.ssh/. To verify,
% ls ~/.ssh/
If you do everything correct, you will now see these two keys,
id_ed25519
id_ed25519.pub
4. Adding your SSH key to the ssh-agent
What is your ssh-agent at all? That is usually a processing thread (shown as a pid) running within your command line tool, for this instance, the macOS Terminal shell.
4.1. Start the ssh-agent
In the Terminal,
$ eval "$(ssh-agent -s)"
#  Agent pid 59566
4.2. Add SSH key to ssh-agent
The command of doing this is,
# don't run this for now if you are using newer macOS
$ ssh-add -K ~/.ssh/id_ed25519
4.2.1. Config it persistently
If you ARE using macOS Sierra 10.12.2 or newer, you need one extra step to make this persistent.
% touch ~/.ssh/config
# touch will check if there exist the file and create one if not
Now Edit the config file you just created (should you not have had it).
Q: But how?
A: There are loads of text editing tools in Linux such like vim and nano. Here we use nano to demonstrate,
% nano ~/.ssh/config
Copy and paste following content to your config file,
Host *
  AddKeysToAgent yes
  UseKeychain yes
  IdentityFile ~/.ssh/id_ed25519
How to save and exit nano? You get it.
Ctrl+O: Save the editingCtrl+X: Exitnanoediting session
This enable your OS to automatically load keys into the ssh-agent and store passphrases in your keychain.
Finally, add the SSH key to your ssh-agent,
# set up config to make persistency first if use newer macOS
$ ssh-add -K ~/.ssh/id_ed25519
5. Test your SSH connection
In your Terminal,
$ ssh -T git@github.com
# Attempts to ssh to GitHub
You may see a warning like this:
The authenticity of host 'github.com (IP ADDRESS)' can't be established.
RSA key fingerprint is SHA256:nThbg6kXUpJWGl7E1IGOCspRomTxdCARLviKw6E5SY8.
Are you sure you want to continue connecting (yes/no)?
Hit yes you will see,
Hi username! You've successfully authenticated, but GitHub does not provide shell access.
You git is accessible through SSH via your command line tools now.
6. Reference
- https://docs.github.com/en/github/authenticating-to-github/connecting-to-github-with-ssh